
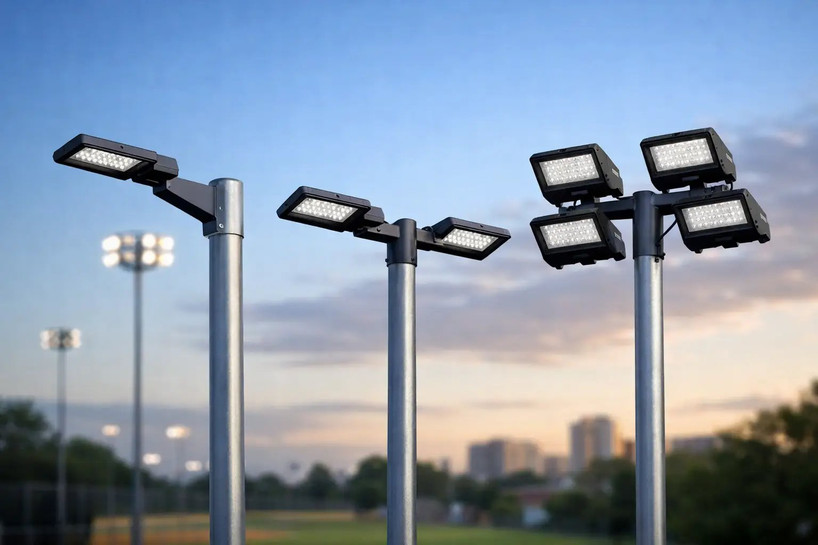
A parking lot fixture can have the right wattage, lumen output, and color temperature and still be the wrong installation if the mount does not match the pole. LED lighting pole brackets determine where a fixture sits, how it is aimed, how loads transfer to the pole, and whether the completed installation can withstand site conditions. For contractors and facility buyers, the bracket is not an accessory to choose at the end. It is part of the fixture-and-pole system.
What LED Lighting Pole Brackets Do
A pole bracket connects a luminaire to a steel, aluminum, fiberglass, or concrete pole. Depending on the design, it may place the fixture at the pole top, extend it out from the pole shaft, support it on a tenon, or hold multiple fixtures around a single pole. The bracket also establishes the fixture’s orientation, which affects beam distribution, glare control, and coverage at the perimeter of a parking area, roadway, walkway, or equipment yard.
The correct bracket must work with three components: the selected fixture, the existing or specified pole, and the application. A common mistake is assuming that any outdoor LED area light will attach to any round or square pole. Fixture mounting hardware is often model-specific. Pole drilling patterns, tenon diameters, shaft shapes, wall thicknesses, and wind-load ratings can all limit the available options.
For new construction, choose the fixture mounting configuration before ordering poles. For retrofits, document the existing pole and mounting details before selecting replacement equipment. That sequence prevents field modifications, delayed installs, and mismatched hardware.
Start With the Fixture Mounting Method
Commercial LED area lights and flood lights are sold with several mounting options. The fixture listing may describe these as arms, brackets, slip fitters, direct mounts, or pole mounting accessories. The naming differs by manufacturer, but the physical connection must match.
Slip-fitter and tenon mounts
A slip fitter slides over a round tenon and is secured with set screws or bolts. This is a frequent choice for shoebox area lights, flood lights, and sports lighting because it allows field aiming. The key specification is the tenon outside diameter. A bracket sized for a 2 3/8-inch tenon will not correctly fit a different diameter without an approved adapter.
Verify whether the fixture is intended for a vertical tenon, a horizontal tenon, or an adjustable fitter. An adjustable fitter may help fine-tune a flood light, but it should not be used to compensate for an unsuitable pole location or an inadequate photometric layout.
Direct arm mounts
Direct arm mounts attach to the side of the pole through a specified bolt pattern. They are common for parking lot and roadway fixtures mounted near the top of round or square poles. The arm may be straight, upswept, or angled depending on the fixture family and desired appearance.
This configuration requires close attention to the pole’s factory drilling. Bolt hole spacing and wiring access must align with the arm. A field-drilled pole can introduce corrosion concerns, reduce structural capacity, void manufacturer coverage, or create water-entry paths. When the hole pattern does not match, use a manufacturer-approved adapter or specify a replacement pole configured for the fixture.
Top mounts and bullhorn brackets
Top-mounted brackets install at the pole’s upper end and can support one or multiple fixtures. A bullhorn bracket typically branches from a central pole-top tenon or cap, allowing two, three, or four fixtures to serve different directions. These systems are useful at parking lot intersections, large open lots, sports areas, and sites where one pole must cover multiple zones.
More fixtures on one bracket can reduce pole count, but the trade-off is higher weight, effective projected area, and wind loading at the pole top. The pole, anchor bolts, foundation, bracket, and fixtures must be evaluated as a complete assembly. Do not assume a four-light bullhorn is acceptable simply because it physically fits the pole.
Round and square pole adapters
Some area-light mounting arms are designed for either round or square poles by using a contoured adapter plate. Others require a dedicated round-pole or square-pole version. The distinction matters because a flat mounting plate against a round shaft leaves gaps, can distort during tightening, and may allow movement over time.
Confirm the pole shaft dimensions as well as its shape. A bracket for a 4-inch square pole is not automatically appropriate for a 5-inch square pole, and a round-pole adapter must match the pole diameter range specified by its manufacturer.
Match the Bracket to the Lighting Layout
Bracket selection affects light placement. A fixture placed six inches farther from the shaft or aimed several degrees differently can change overlap between luminaires, spill light at property lines, and light levels near drive lanes or entrances.
A single side-mounted area light generally works well when the pole is positioned along a parking lot edge. A twin mount may be more effective on a median or central island. Multiple heads can provide broad coverage from fewer locations, but they also make uniformity and glare control more dependent on fixture optics and aiming. This is why fixture photometrics should drive the layout rather than fixture count alone.
For flood lights, use an adjustable bracket only where aiming is needed. Building facades, loading yards, signs, athletic areas, and security zones often benefit from adjustment. General parking lot illumination usually performs better with purpose-built area lights and fixed mounting geometry that keeps the optical distribution where it belongs.
Mounting height also matters. Higher poles expand coverage but may need higher-output fixtures, more careful glare control, and larger structural assemblies. Lower mounting heights can improve visual comfort and maintenance access but usually require closer spacing and more poles. The bracket must be rated for the selected fixture at the actual mounting height and exposure.
Check Structural and Environmental Requirements
The bracket is one part of a structural system exposed to wind, vibration, weather, and ongoing fixture weight. Review the fixture’s weight and effective projected area, often listed as EPA, along with the bracket’s allowable load. Then compare the complete assembly with the pole manufacturer’s wind-load chart for the project location.
Wind conditions are not uniform across the United States. Coastal sites, open lots, elevated terrain, and locations with little surrounding shelter can demand more conservative pole and bracket selections. A bracket that is suitable for a compact 100-watt area light may not be suitable for a larger high-output fixture or a multi-head assembly.
Material and finish matter, too. Galvanized steel, aluminum, and powder-coated components are common choices for outdoor brackets. In corrosive environments, verify material compatibility between the pole, bracket, fasteners, and fixture housing. Dissimilar metals can contribute to corrosion if the system is not designed to manage it.
Also inspect ingress protection at the connection point. Wiring should pass through a protected opening, and unused holes should be sealed with approved plugs. A clean-looking installation is not enough if rainwater can enter the pole or wiring compartment.
Installation Details That Prevent Callbacks
Before installation, compare the purchase order, fixture label, bracket part number, pole drawing, and site plan. Confirm voltage and photocell or sensor requirements while the fixture is still accessible. If a fixture includes a side-mounted photocell receptacle, its final orientation can affect daylight sensing and should be considered before tightening the assembly.
Use the manufacturer’s specified hardware, torque values, and gasket components. Set screws on a slip fitter should be tightened evenly, and any aiming adjustment should be locked after final positioning. Torque that is too low can allow movement; excessive torque can damage threads, deform components, or compromise the pole wall.
For retrofit work, inspect the existing pole for rust, impact damage, loose base hardware, cracked handholes, and water accumulation. Replacing a legacy HID fixture with a lighter LED fixture does not automatically make an aging pole safe. The condition of the shaft, base, anchors, and foundation still governs whether the installation is suitable.
Buying the Right Bracket for the Project
Order brackets by the exact fixture family whenever possible. Generic hardware may appear similar but can change the fixture’s rating, fit, or warranty position. For project quantities, keep fixture model, mounting style, pole shape, pole dimensions, and head count together on the order so the installation team receives compatible components.
At Last Stop Lighting, commercial buyers can source area lights, flood lights, poles, and mounting-related parts through one purchasing channel, which makes it easier to align the fixture package before materials reach the jobsite. When specifications are unclear, confirm the fixture’s approved mount and the pole manufacturer’s drilling and load data before release.
The best bracket is the one that disappears into a properly planned installation: it fits the pole without modification, carries the intended fixture safely, puts light where the site needs it, and gives the maintenance team a dependable assembly for years of service.